shaggyballs
Active Member
- Joined
- Mar 21, 2014
- Messages
- 28
- Reaction score
- 3
Please remember to share what you have learned with others!!
Any who wish to profit himself alone from the knowledge given him, rather than serve others through the knowledge he has gained from learning, is betraying knowledge and rendering it worthless!
How to tell Male from a Female
Female on left..............................................................Male on the right
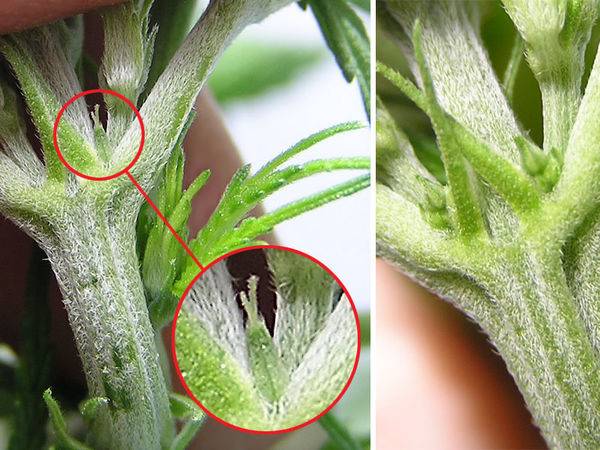
Early Male
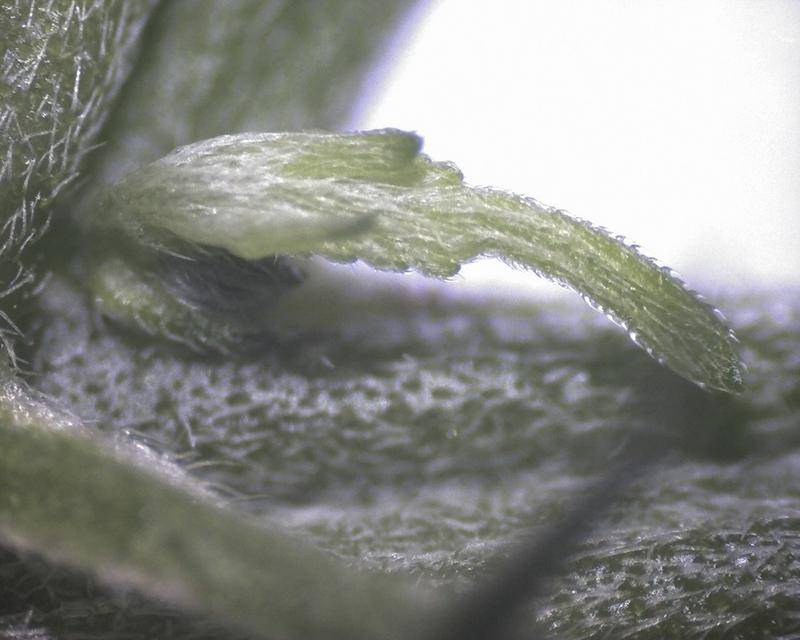
Female
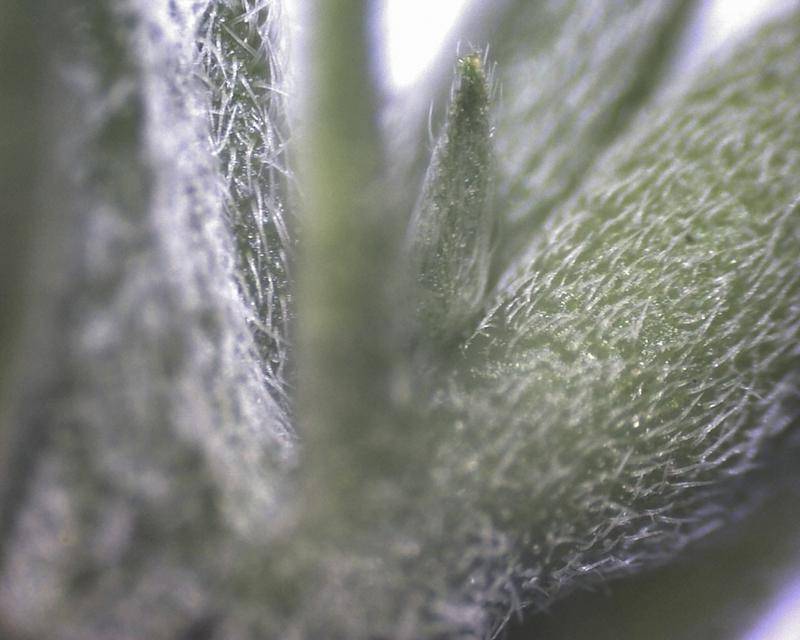
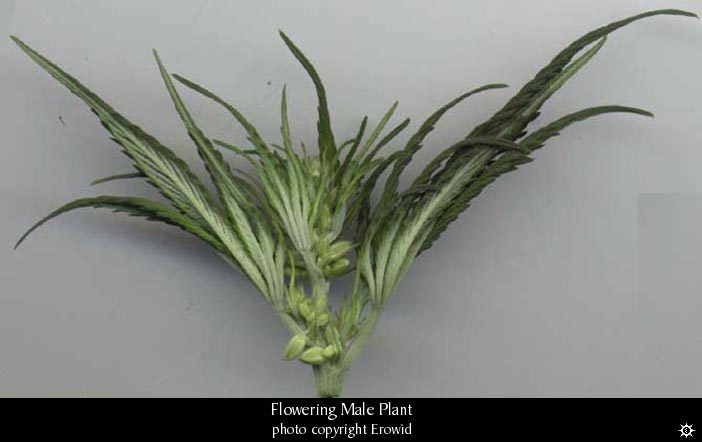
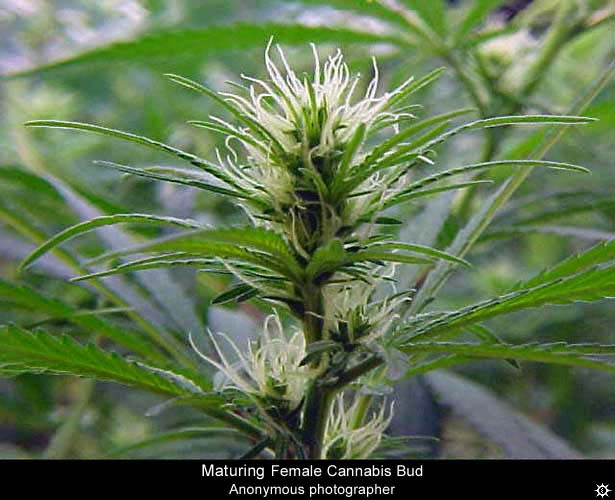
If you are not sure wait!
The ball clusters will grow in numbers and swell up in size, then start to hang, then eventually open and release their pollen!
But this can take a while.
common mistakes made by newbies
med-man method of growing
GROW FAQ
ICMAG'S OFFICIAL ~DIY~ LINK-O-RAMA
OVERGROW FAQ
Make your own hydro systems.
http://www.diynetwork.com/videos/hydroponic-gardening/35023.html
http://www.diynetwork.com/search/results.do?diySearchString=hydroponics&diySearchType=diynetwork.com
Using Surfactants, Wetting Agents, and Adjuvants in the Greenhouse
In depth study of Nutrients and Additives for Cannabis
Brix=Healthy Plants
How-To's video
Cloning
There is no question that having a strong root system is the best way to have a STRONG plant structure and BIG FAT STICKY BUDS!!!
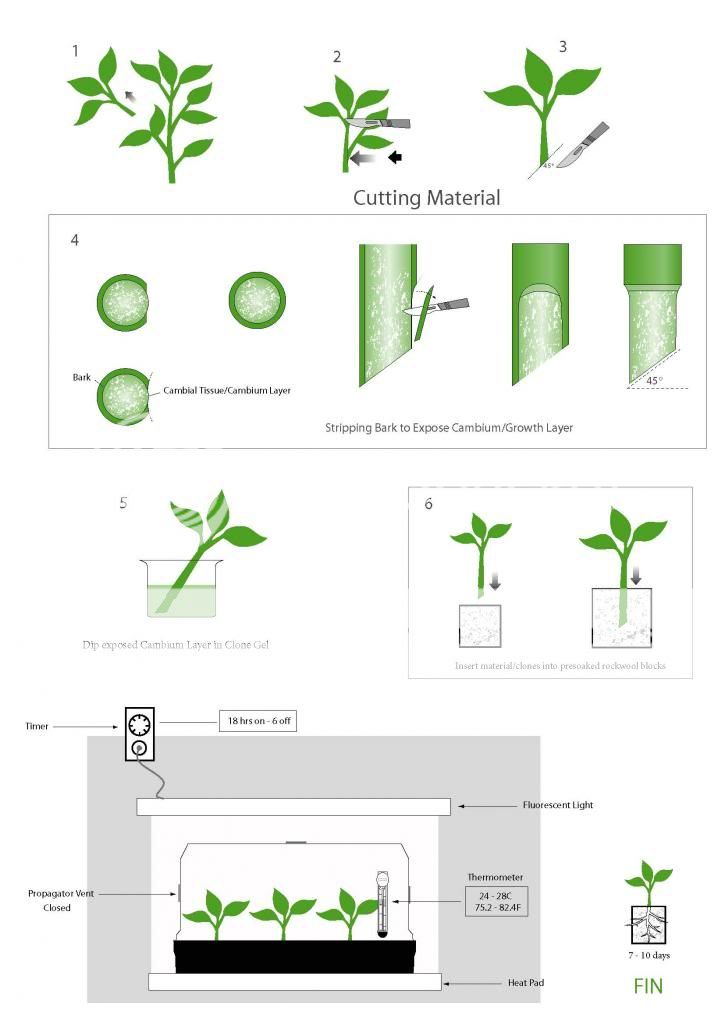
Cloning For Hydroponic Growers
AEROCLONER
This technique of cloning is done by taking a cutting, and suspending it in the air for water to be absorbed in mist form. If you missed the article on how to make your own Aeroponic Clone Box, click here!
Directions:
Step 1: For best results, use a pair of latex gloves and a sterilized blade for cutting. “Keeping it Clean” will help prevent against unwanted bacteria growth and diseases; ultimately increasing your success rate. Make sure your cloning box is ready to go, no leaks and such. Make sure your lights are working properly. You should have a weak light (CFL or T5) for new clones to prevent light poisoning. New clones do not need much light.
Step 2: Liquid cloning solution is not 100% necessary, but drastically decreases the time it takes to grow new roots (In as little as 3 days!). Do NOT freak out if your clones take up to 20 days to show roots! This is normal, some strains may take longer than others. You should also note, that cuttings can be taken from any part of the plant (lower or upper part of the plant), but cuttings taken from new growth (upper part) generally root faster, and are generally healthier clones.
Step 3: Find the cutting you want, and remove it from the plant with a 45° angle cut. You can take the branch off and then cut the angle if it is easier. Gently scuff and remove the top layer of plant material (Epidermis) from the base where you made your cut.
Step 4: Soak in a cloning solution or water for 2 minutes before placing into your clone box. You can cut your fan leaves in half to create more room, and to allow your new cuttings to concentrate more on making roots.
Step 5: Maintain a temperature of 70°F-78°F and RH (relative humidity) of 70-80%. Spray leaves frequently (1-3 times a day) with pH 6.0 water. C02 supplement may be added, 1000-1500 ppm max.
Step 6: Now, just maintain and wait! Newly developed clones can be transplanted into both soil or a hydroponic system. Plants should have a vigorous amount of roots before being transplanted to decrease the chances of transplant shock.
DIY AEROCLONER

Seed germination
Well, I'm not a fan of the paper towel method.....sorry.
The First 72 hours of a seed's life determines sex!
Best Practice for germinating seeds......not my opinion, this is science......
1.) the term "gravitropism" Basically means, roots grow down and stems grow up. This is very important! The emerging radicle isn't happy if it can't grow down and the emerging cotyledon and stem gets upset if it can't grow up! Stress=male.
2.)Roots hate light. Light on roots creates stress. Stress=male.
3.)delicate root hairs are damaged when the roots are handled, IE taken out of the paper and then put into medium.
4.)roots adapt to the medium. Hydro roots are very different than their soil counterparts. Roots in a sterile medium do not have the mychoryzal symbiotes....etc. Therefore, going from paper towel to soil=stress!
Those are just Botanical Facts!
So, keeping the facts in mind here's the best way to germinate Cannabis seeds:
1.)make a hole in the well watered, moist soil with a stick, dowel, finger.....fill the hole with a root inoculate like Myco's or other suitable inoculation. We want to colonize the root zone ASAP and nothing works better than germinating the seed with all the friendlies right there in the soil.
2.)put seed in the hole, gently cover the seed and put it under bright light with temps about 72-75 degrees. The bright light is very important! T5's are great for this.
3.)keep the soil ever so slightly moist until you see germination. Once you see the emerging cotyledon, stop misting! You don't want damping off!
4.)do NOT germinate seeds in a high humidity environment, like a clone dome, etc. High humidity is for cuttings not seeds!
Solo cups with holes poked in the bottom work well, as do small nursery pots. Large containers hold too much water for proper germination....it's best to germ in small containers and then transplant.
I know people have success with the paper towel method....but they also have success with this method as well. One would rarely get less than 70% females using this technique.
Sterile rez or bennie's
Basically it comes down to this: Your garden will produce dead plant matter. Something must happen to it. If you do nothing the fungi and bacteria already in the area will eat it. So you can sterilize, which is ez and works great, But must be repeated every 3-5 days .
Or you can start your own little battle of the microbes and see who wins, if you add plenty of good microbes you have a good chance that the good microbes will win.
I recommend microbes personally!
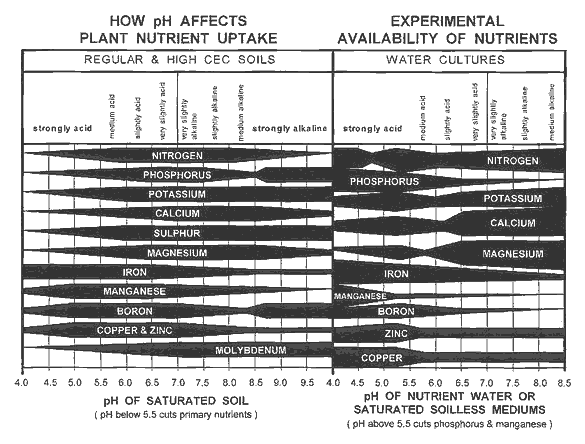
NUTRIENT AVAILABILITY
PH isn't the only parameter that needs to be managed.
EC/PPM is more important - it regulates transpiration.
Chelated nutrients make pH even less critical. pH drifts because the plants use up ions. What's the point of a stable pH if there's no food? So in soil the microbes and the plant changes the PH of the soil to absorb the nutes that become available at a higher or lower PH! (or there will be a resulting element imbalance causes antagonisms) A good solution for hydro growers is to replenish nutes more often, which also stabilizes pH.
Or better yet Drain to Waste if you can!!



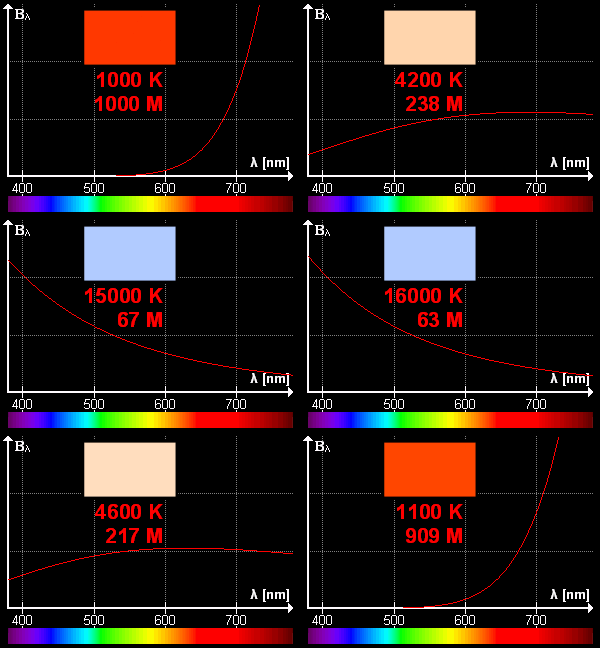
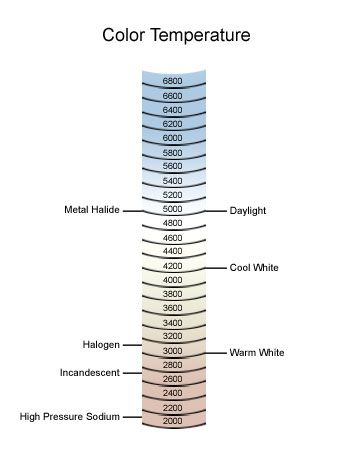
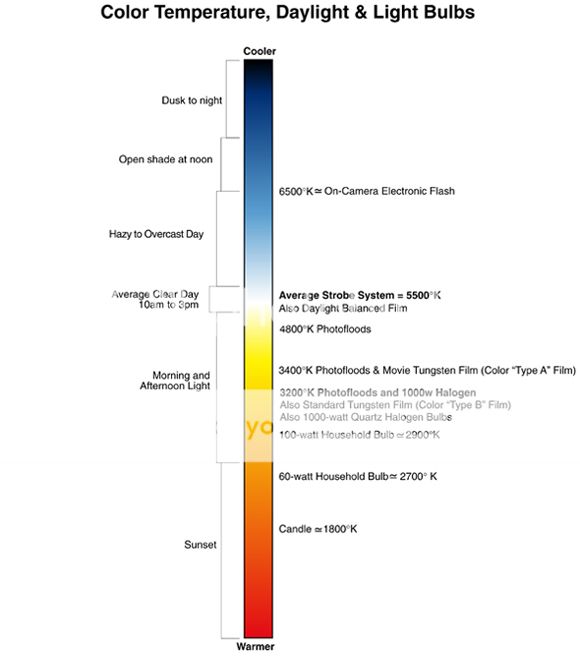
High-Pressure Sodium
High-Pressure Sodium- HPS Lamps are probably the most innovated bulb on the market for flowering. There are many shapes, sizes and brands of bulbs. For every HPS bulb, you need a rated ballast for it. 35, 50, 70, 100, 150, 200, 310, 400, 600 and 1000 watt bulbs all require a ballast. A 1000w bulb needs a 1000w ballast. Some ballasts are switchable from HPS to MH, and some are switchable from 110v-220v. It is completely necessary to use the rated ballast for each bulb, as each are very unique on how they run. Some HPS bulb companies include (but not limited to): Philips (SonAgro), Westinghouse (Ceramalux), Sylvania (Lumalux), GE (Lucalox), EYE (Hortilux). HPS run on the red, orange and yellow band, around 630nm. This is most comparable to the harvest sun, which is why they are most ideal for flowering. An HPS lamp operates by passing electricity through vaporized mercury and sodium within the arc tube.
High pressure sodium lamps vary between 90/150 lm/w (A 1000w bulb will typically emit 100,000+ lumens). Their average lifespan is twice that of metal halides, but after 18,000 hours of use, they will start to draw more electricity than their rated watts while gradually producing less light. HPS bulbs are very efficient. Their disadvantage is they are deficient in the blue spectrum. If a gardener were to start a young plant under a HPS bulb, she/he would see impressive vertical growth. In fact, probably too impressive. Most plants would grow up thin and lanky and in no time you will have to prune your plant back before it grows into the light fixture. This sometime poses a problem for new growers. When using an HPS light, plants tend to have more “empty” space in between nodes, which is mostly just wasted space. Most experienced growers prefer using fluorescent or MH lights in the vegetative state to avoid this. Plants that get too big, too fast, often have issues during the flowering stage. They get too big to support themselves, and require more light/water/nutrients to survive. Most growers will argue, that although HPS lights WILL grow your plants bigger and faster, that doesn’t always mean you’ll have a bigger yield. Metal Halide lights emit the blue spectrum, which will promote slower, thicker (bushier) growth. This, typically, is what most growers prefer. Smaller, bushier plants take up less room. The flower of the plant will look different depending on the type of bulb used. If using an HPS light through the entire life of the plant, you will notice “popcorn” buds throughout the plant. This is because of the long spaces between nodes. When budding a smaller, bushier plant, it will seem as if the entire stem is a bud, because there is little room between nodes.
At the end of life, high-pressure sodium lamps exhibit a phenomenon known as cycling, which is caused by a loss of sodium in the arc. Sodium is a highly reactive element, and is easily lost by reacting with the arc tube made of aluminum oxide and the products are sodium oxide and aluminum:
6 Na + Al2O3 → 3 Na2O + 2 Al
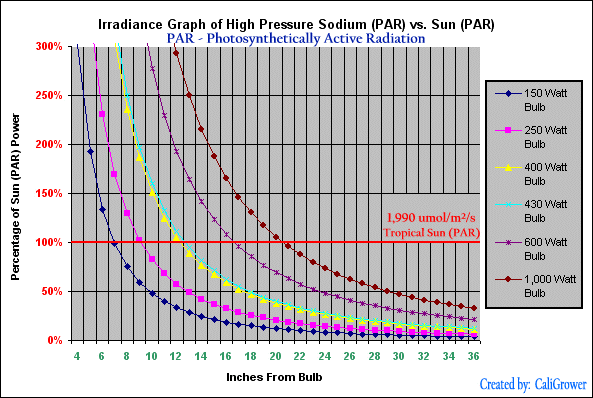
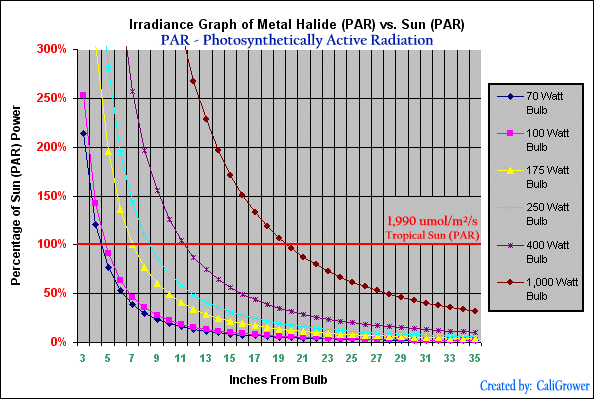
As a result, these lamps can be started at a relatively low voltage but as they heat up during operation, the internal gas pressure within the arc tube rises and more and more voltage is required to maintain the arc discharge. As a lamp gets older, the maintaining voltage for the arc eventually rises to exceed the maximum voltage output by the electrical ballast. As the lamp heats to this point, the arc fails and the lamp goes out. Eventually, with the arc extinguished, the lamp cools down again, the gas pressure in the arc tube is reduced, and the ballast can once again cause the arc to strike. The effect of this is that the lamp glows for a while and then goes out, repeatedly. The major disadvantage to using HPS lights, is that they create a lot of heat. If you have an open faced hood, it’s difficult to keep the temperature down enough to keep it close to your plants. That’s why it’s recommended to use a hood that has a glass insulation cover and ventilation holes on the side so you can hook up an exhaust fan to help keep things cool. This will allow you to keep your light as close as possible without burning them up, so you can make the most of your light. Below is a guide for how many lumens are lost with the distance your light is from your plants.
Pros: High Pressure Sodium lights are currently the industry-leading choice of light bulb. It has the best overall lumen/watt ratio, the strongest intensity, a wide range of spectrum and last much longer then other traditional growing bulbs.
Cons: High Pressure Sodium bulbs are rather expensive, both initial cost and power consumption. They produce a lot of heat, and if not properly installed they can be dangerous. If not properly ventilated, they can pose heat problems and potentially burn your plants.
HPS emery consumption chart
HID Light Output Primary Growing Area Supplemental Area
100 watts 2′ x 2′ 3′ x 3′
250 watts 3′ x 3′ 4′ x 4′
400 watts 4′ x 4′ 6′ x 6′
600 watts 8′ x 8′ 12′ x 12′
MH (Metal Halide)
MH (Metal Halide) is a member of the high-intensity discharge (HID) family of lamps. They produce high light output for their size, making them a compact, powerful, and efficient light source. Like other gas-discharge lamps such as the very similar mercury-vapor lamps, metal-halide lamps produce light by making an electric arc in a mixture of gases. In a metal-halide lamp, the compact arc tube contains a high-pressure mixture of argon, mercury, and a variety of metalhalides. The mixture of halides will affect the nature of light produced, influencing the correlated color temperature and intensity (making the light bluer, or redder, for example). The argon gas in the lamp is easily ionized, and facilitates striking the arc across the two electrodes when voltage is first applied to the lamp. The heat generated by the arc then vaporizes the mercury and metal halides, which produce light as the temperature and pressure increases. MH emits mostly blue, which is why growers find it suitable for vegetation. They allow your plant to grow at it’s own rate; unlike when using HPS, the plant feels the need to grow faster. Using MH during vegetation ensures a grower a bushy, fulled out plant. The nodes will be closer together apposed to using HPS.
Pros: Metal Halide lights go hand-in-hand with High Pressure Sodium lamps, being the industry’s leading source of light. They produce very good lumen/w output, offering a wide range of spectrum (mostly blue) and are relatively cheap. They are the best suitable for vegetation; normally providing a very even and bushy growth.
Cons: Metal Halide lights “burn out” faster than other grow bulbs (about 1/2 the life of a typical HPS). They run very hot, much like HPS lights, so ventilation is a must. Metal Halide lights also (unless a dual ballast) require there own type of ballast.


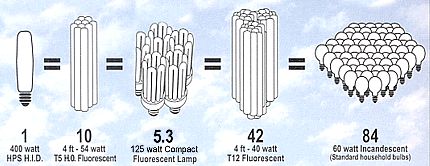
HUMIDITY
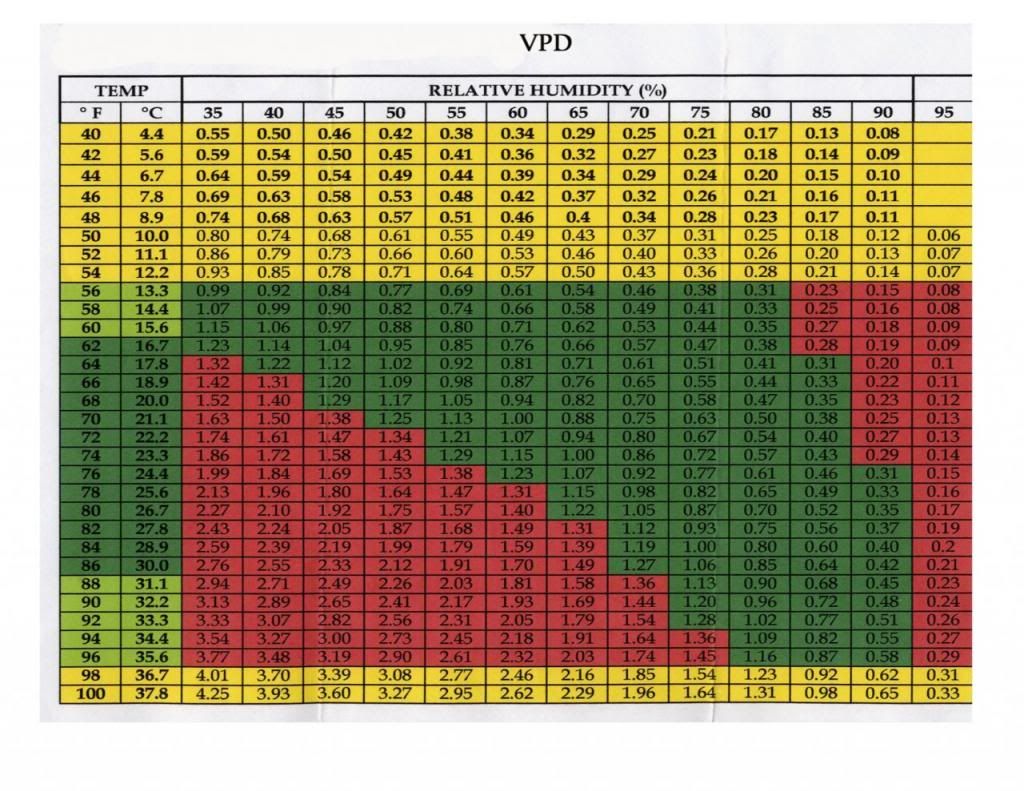
Figures in green are the sweet spot, yellow and red are out of range.
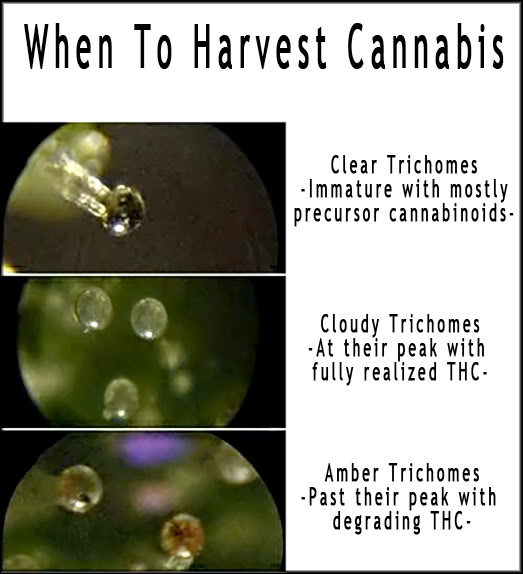
Trichomes 101


LOCKOUT
What is Nutrient Lockout?
[ame="http://www.youtube.com/watch?v=AVM4Y5IvYt4"]LOCKOUT VIDEO[/ame]
Nutrient lockout is when a plant is unable to uptake a nutrient or nutrients, even if the nutrients are readily available. Basically, the nutrients may be in the soil or media you are using, but your plants won’t be able to absorb them. This is caused by two different ways. The most common way is by an unbalance of pH in your solution or media. The other way is because of an excess amount of nutrients, thus locking out other nutrients. For example, too much Nitrogen will lockout Potassium and Calcium.
Cloudy water!
There is no such thing as lockout as a chemistry term. You basically are seeing ions re-combining in different ways, and some are more soluble in water than others, but if you are seeing the cloudiness go away, that means it re-dissolved. i.e. "no lockout".
The temporary cloudiness simply has to do with a localized concentration is that is temporarily too high. Then diffusion allows for the concentration of that 'less soluble' species to decrease to where it dissolves again.
So if your adding something that is of high or low PH then dilute it first and or make it PH neutral.
Or else you will make 2 parts combine into 1 and settle to the bottom or moving around as visible particles......cloudy water!!!!
Nutrient pH lockout chart

mobile elements
A mobile element, such as nitrogen, is able to move itself around the plant as needed. For this reason, signs of deficiencies are first noticed in the older leaves. The plant will send mobile elements to where it needs it most, which is new developing foliage and leaves. So mobile elements will always show in older leaves, because the plant will send those nutrients to new development.
Immobile elements
Immobile elements are those that cannot move around the plant as needed, staying stationary in their original destination. Elements such as boron are immobile, which deficiencies almost always occur in the new leaves. Since new foliage is born lacking a certain element, it is going to grow abnormally, or deficient. Since an immobile cannot travel where it’s needed, newer growth will be the first to show signs, while the older leaves will appear normal (because the old leaves still have traces of that nutrient).
What are Macronutrients (Essential Nutrients)?
Nutrients that are required in higher amounts and are necessary for plant development.
Macronutrients (Primary Nutrients): Nitrogen, Phosphorus, Potassium
Macronutrients (Secondary Nutrients): Calcium, Magnesium, Sulfur
Two University of California plant physiologists, Arnon and Stout, set three requirements that an element must meet in order to be considered “essential”:
1. Omission of the element in question must result in abnormal growth, failure to complete the life cycle, or premature death of the plant.
2. The element must be specific and not replaceable by another.
3. The element must exert its effect directly on growth or metabolism and not by some indirect effect, such as by antagonizing another element present at a toxic level.
Elements that are required in very small amounts for proper photosynthesis.
Micronutrients (Trace Minerals): Boron, Copper, Iron, Manganese, Molybdenum, Zinc, (Chloride)*
The commonly used unit of concentration for the micronutrients is parts per million (ppm), avoiding the confusion that would come with decimals if the concentration in the plant’s dry weight were in per cent. In metric units, micronutrient concentration is expressed in milligrams per kilogram (mg/kg). One ppm is equal to 1 mg/kg. Another equivalence for solution concentration used in this article is milligram per liter (mg/L) equal to parts per million (ppm).
What are Micronutrients (Trace Minerals)?
Micronutrients as a group, are far more critical in terms of their control and management than most of the major elements, particularly in soilless culture systems. Most micronutrient deficiencies can usually be corrected easily and quickly, but when dealing with excesses or toxicities, correction can be difficult, if not impossible. If toxicity occurs, the grower may well have to start over. Therefore, great care must be taken to ensure that an excess concentration of a micronutrient be not introduced into the rooting media, either initially or during the growing season.
The availability of some of the micronutrients, particularly Fe, Mn, and Zn, are significantly affected by the pH of the rooting medium, particularly in organic soilless mixes. A pH greater than 5.5 can result in a micronutrient deficiency, though a recommended quantity of that micronutrient had been added to the mix. The level of a major element, particularly high P, in a rooting medium will affect the uptake of Cu, Fe, Mn, and Zn. Therefore, proper control of the pH and concentration of major elements in a rooting medium are important to ensure “available” sufficiency.
Since the requirements for some of the micronutrients are relatively low, there may be sufficient concentration in the natural environment (i.e., in the water used to make a nutrient solution, in the inorganic or organic rooting media substance, as a contaminate in a major element supplying reagent or fertilizer, or from contact with piping, storage tanks, etc.) to preclude the necessity to add micronutrient. Therefore, it is best to analyze a prepared nutrient solution after constituting it and after contact with the environment to determine its micronutrient content. In addition, careful monitoring of the rooting media and plants will ensure that the plant’s micronutrient requirement is being satisfied but not exceeded.
*Some scientists believe chloride should not be listed as a trace mineral, since plants contain so little amounts of it and the amount it takes can easily be found in the soil or rainwater, it does not deserve to have its own page as a trace mineral.
Other elements also play a part in plant growth. Aluminum, chlorine, cobalt, iodine, selenium, silicon, sodium and vanadium are not normally included in nutrient mixes. They are required in very minimal amounts that are usually present as impurities in the water supply or mixed along with other nutrients.
Chlorine (Chloride) (Cl) Immobile
What's Chlorine's (Chloride) purpose in photosynthesis?
Purpose: Fundamental in photosynthesis and cell division in the roots and foliage. It increases osmotic pressure in the cells, which open and close the stomata to regulate moisture flow within the plant tissue.
Deficiency/Toxicity: Because it’s needed in such small amounts, deficiencies rarely occur. In the rare case a deficiency does occur, roots may become stubby, new leaves will wilt and be pale. Leaves will turn bronze with progression. Both a deficiency and toxicity will show the same characteristics!
Treatments: For deficiencies, use chlorinated water. For toxicity, flush the soil out with clean, un-chlorinated water. Let water sit for 24-48 hours before using (chlorine evaporates into the atmosphere).
Cobalt (Co) Immobile
What's Cobalt's purpose in photosynthesis?
Purpose: Necessary to help beneficial bacteria grow. Vital for nitrogen absorption, and scientific evidence suggests its linked to enzymes needed to form aromatic compounds. Cobalt is essential to many beneficial bacteria that are involved in nitrogen fixation of legumes. It is a component of vitamin B12 which is essential to most animals and possibly in plants. Reports suggest that it may be involved with enzymes needed to form aromatic compounds. Otherwise, it is not understood fully as to its benefit to plant growth, but it is considered essential to some animal health issues.
What's Silicon's purpose in photosynthesis?
Silicon usually exists in solution as silicic acid and is absorbed in this form. It accumulates as hydrated amorphous silica most abundantly in walls of epidermal cells, but also in primary and secondary walls of other cells. It is largely available in soils and is found in water as well. Inadequate amounts of silicon can reduce tomato yields as much as 50%, cause new leaves to be deformed and inhibit fruit set. At this time toxicity symptoms are undetermined.
What's Sodium's purpose in photosynthesis?
Sodium seems to encourage crop yields and in specific cases it acts as an antidoting agent against various toxic salts. It may act as a partial substitute for potassium deficiencies. Excess may cause plant toxicity or induce deficiencies of other elements. If sodium predominates in the solution calcium and magnesium may be affected.
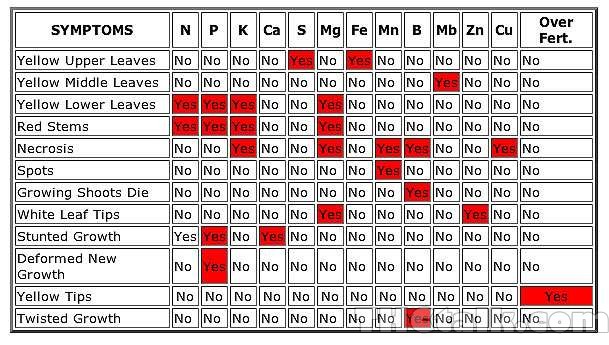
Nutrient deficiencies
Nutrient deficiencies are caused by too much or too little of one or several nutrients being available. Nutrients are available between a pH range of 5 and 7 and a Parts Per Million (PPM) range of 0 to 2000. To maintain these conditions is the key to the perfect nutrient uptake. However, the best conditions would be a pH level of 5.8 for hydroponics, and 6.3 for soil and coco media. PPM (parts per million), should be between 0-300 for small cuttings and seedlings, 700 for vegetative stage, and up to 1500-1700 in full bloom.
Over twenty elements are needed for a plant to grow. Carbon, hydrogen and oxygen are absorbed from the air and water. The rest of the elements, called mineral nutrients, are dissolved in the nutrient solution. The primary or macro- nutrients (nitrogen (N), phosphorus (P) and potassium (K)) are the elements plants use the most. Calcium (Ca) and magnesium (Mg) are secondary nutrients and used in smaller amounts. Iron (Fe), sulfur (S), manganese (Mn), boron (B), molybdenum (Mo), zinc (Zn) and copper (Cu) are micro-nutrients or trace elements. Trace elements are found in most soils. Rockwool (hydroponic) fertilizers must contain these trace elements, as they do not normally exist in sufficient quantities in rockwool or water. Other elements also play a part in plant growth. Aluminum, chlorine, cobalt, iodine, selenium, silicon, sodium and vanadium are not normally included in nutrient mixes. They are required in very minimal amounts that are usually present as impurities in the water supply or mixed along with other nutrients. (The nutrients must be soluble (able to be dissolved in water) and go into solution.)
(Note: A plant may have a certain deficiency from nutrient lockout. In cases of nutrient lockout, the nutrient may be in the soil but the plant is unable to uptake it. For example, too much calcium in the soil will cause a potassium lockout. Although you may see signs of potassium deficiency, what you really have is a calcium buildup. To fix this, you will have to flush your plants and adjust the pH before applying anymore (in this case) potassium.)

Any who wish to profit himself alone from the knowledge given him, rather than serve others through the knowledge he has gained from learning, is betraying knowledge and rendering it worthless!
How to tell Male from a Female
Female on left..............................................................Male on the right

Early Male
Female


If you are not sure wait!
The ball clusters will grow in numbers and swell up in size, then start to hang, then eventually open and release their pollen!
But this can take a while.
common mistakes made by newbies
med-man method of growing
GROW FAQ
ICMAG'S OFFICIAL ~DIY~ LINK-O-RAMA
OVERGROW FAQ
Make your own hydro systems.
http://www.diynetwork.com/videos/hydroponic-gardening/35023.html
http://www.diynetwork.com/search/results.do?diySearchString=hydroponics&diySearchType=diynetwork.com
Using Surfactants, Wetting Agents, and Adjuvants in the Greenhouse
In depth study of Nutrients and Additives for Cannabis
Brix=Healthy Plants
How-To's video
Cloning
There is no question that having a strong root system is the best way to have a STRONG plant structure and BIG FAT STICKY BUDS!!!

Cloning For Hydroponic Growers
AEROCLONER
This technique of cloning is done by taking a cutting, and suspending it in the air for water to be absorbed in mist form. If you missed the article on how to make your own Aeroponic Clone Box, click here!
Directions:
Step 1: For best results, use a pair of latex gloves and a sterilized blade for cutting. “Keeping it Clean” will help prevent against unwanted bacteria growth and diseases; ultimately increasing your success rate. Make sure your cloning box is ready to go, no leaks and such. Make sure your lights are working properly. You should have a weak light (CFL or T5) for new clones to prevent light poisoning. New clones do not need much light.
Step 2: Liquid cloning solution is not 100% necessary, but drastically decreases the time it takes to grow new roots (In as little as 3 days!). Do NOT freak out if your clones take up to 20 days to show roots! This is normal, some strains may take longer than others. You should also note, that cuttings can be taken from any part of the plant (lower or upper part of the plant), but cuttings taken from new growth (upper part) generally root faster, and are generally healthier clones.
Step 3: Find the cutting you want, and remove it from the plant with a 45° angle cut. You can take the branch off and then cut the angle if it is easier. Gently scuff and remove the top layer of plant material (Epidermis) from the base where you made your cut.
Step 4: Soak in a cloning solution or water for 2 minutes before placing into your clone box. You can cut your fan leaves in half to create more room, and to allow your new cuttings to concentrate more on making roots.
Step 5: Maintain a temperature of 70°F-78°F and RH (relative humidity) of 70-80%. Spray leaves frequently (1-3 times a day) with pH 6.0 water. C02 supplement may be added, 1000-1500 ppm max.
Step 6: Now, just maintain and wait! Newly developed clones can be transplanted into both soil or a hydroponic system. Plants should have a vigorous amount of roots before being transplanted to decrease the chances of transplant shock.
DIY AEROCLONER

Seed germination
Well, I'm not a fan of the paper towel method.....sorry.
The First 72 hours of a seed's life determines sex!
Best Practice for germinating seeds......not my opinion, this is science......
1.) the term "gravitropism" Basically means, roots grow down and stems grow up. This is very important! The emerging radicle isn't happy if it can't grow down and the emerging cotyledon and stem gets upset if it can't grow up! Stress=male.
2.)Roots hate light. Light on roots creates stress. Stress=male.
3.)delicate root hairs are damaged when the roots are handled, IE taken out of the paper and then put into medium.
4.)roots adapt to the medium. Hydro roots are very different than their soil counterparts. Roots in a sterile medium do not have the mychoryzal symbiotes....etc. Therefore, going from paper towel to soil=stress!
Those are just Botanical Facts!
So, keeping the facts in mind here's the best way to germinate Cannabis seeds:
1.)make a hole in the well watered, moist soil with a stick, dowel, finger.....fill the hole with a root inoculate like Myco's or other suitable inoculation. We want to colonize the root zone ASAP and nothing works better than germinating the seed with all the friendlies right there in the soil.
2.)put seed in the hole, gently cover the seed and put it under bright light with temps about 72-75 degrees. The bright light is very important! T5's are great for this.
3.)keep the soil ever so slightly moist until you see germination. Once you see the emerging cotyledon, stop misting! You don't want damping off!
4.)do NOT germinate seeds in a high humidity environment, like a clone dome, etc. High humidity is for cuttings not seeds!
Solo cups with holes poked in the bottom work well, as do small nursery pots. Large containers hold too much water for proper germination....it's best to germ in small containers and then transplant.
I know people have success with the paper towel method....but they also have success with this method as well. One would rarely get less than 70% females using this technique.
Sterile rez or bennie's
Basically it comes down to this: Your garden will produce dead plant matter. Something must happen to it. If you do nothing the fungi and bacteria already in the area will eat it. So you can sterilize, which is ez and works great, But must be repeated every 3-5 days .
Or you can start your own little battle of the microbes and see who wins, if you add plenty of good microbes you have a good chance that the good microbes will win.
I recommend microbes personally!
NUTRIENT AVAILABILITY
PH isn't the only parameter that needs to be managed.
EC/PPM is more important - it regulates transpiration.
Chelated nutrients make pH even less critical. pH drifts because the plants use up ions. What's the point of a stable pH if there's no food? So in soil the microbes and the plant changes the PH of the soil to absorb the nutes that become available at a higher or lower PH! (or there will be a resulting element imbalance causes antagonisms) A good solution for hydro growers is to replenish nutes more often, which also stabilizes pH.
Or better yet Drain to Waste if you can!!


High-Pressure Sodium
High-Pressure Sodium- HPS Lamps are probably the most innovated bulb on the market for flowering. There are many shapes, sizes and brands of bulbs. For every HPS bulb, you need a rated ballast for it. 35, 50, 70, 100, 150, 200, 310, 400, 600 and 1000 watt bulbs all require a ballast. A 1000w bulb needs a 1000w ballast. Some ballasts are switchable from HPS to MH, and some are switchable from 110v-220v. It is completely necessary to use the rated ballast for each bulb, as each are very unique on how they run. Some HPS bulb companies include (but not limited to): Philips (SonAgro), Westinghouse (Ceramalux), Sylvania (Lumalux), GE (Lucalox), EYE (Hortilux). HPS run on the red, orange and yellow band, around 630nm. This is most comparable to the harvest sun, which is why they are most ideal for flowering. An HPS lamp operates by passing electricity through vaporized mercury and sodium within the arc tube.
High pressure sodium lamps vary between 90/150 lm/w (A 1000w bulb will typically emit 100,000+ lumens). Their average lifespan is twice that of metal halides, but after 18,000 hours of use, they will start to draw more electricity than their rated watts while gradually producing less light. HPS bulbs are very efficient. Their disadvantage is they are deficient in the blue spectrum. If a gardener were to start a young plant under a HPS bulb, she/he would see impressive vertical growth. In fact, probably too impressive. Most plants would grow up thin and lanky and in no time you will have to prune your plant back before it grows into the light fixture. This sometime poses a problem for new growers. When using an HPS light, plants tend to have more “empty” space in between nodes, which is mostly just wasted space. Most experienced growers prefer using fluorescent or MH lights in the vegetative state to avoid this. Plants that get too big, too fast, often have issues during the flowering stage. They get too big to support themselves, and require more light/water/nutrients to survive. Most growers will argue, that although HPS lights WILL grow your plants bigger and faster, that doesn’t always mean you’ll have a bigger yield. Metal Halide lights emit the blue spectrum, which will promote slower, thicker (bushier) growth. This, typically, is what most growers prefer. Smaller, bushier plants take up less room. The flower of the plant will look different depending on the type of bulb used. If using an HPS light through the entire life of the plant, you will notice “popcorn” buds throughout the plant. This is because of the long spaces between nodes. When budding a smaller, bushier plant, it will seem as if the entire stem is a bud, because there is little room between nodes.
At the end of life, high-pressure sodium lamps exhibit a phenomenon known as cycling, which is caused by a loss of sodium in the arc. Sodium is a highly reactive element, and is easily lost by reacting with the arc tube made of aluminum oxide and the products are sodium oxide and aluminum:
6 Na + Al2O3 → 3 Na2O + 2 Al
As a result, these lamps can be started at a relatively low voltage but as they heat up during operation, the internal gas pressure within the arc tube rises and more and more voltage is required to maintain the arc discharge. As a lamp gets older, the maintaining voltage for the arc eventually rises to exceed the maximum voltage output by the electrical ballast. As the lamp heats to this point, the arc fails and the lamp goes out. Eventually, with the arc extinguished, the lamp cools down again, the gas pressure in the arc tube is reduced, and the ballast can once again cause the arc to strike. The effect of this is that the lamp glows for a while and then goes out, repeatedly. The major disadvantage to using HPS lights, is that they create a lot of heat. If you have an open faced hood, it’s difficult to keep the temperature down enough to keep it close to your plants. That’s why it’s recommended to use a hood that has a glass insulation cover and ventilation holes on the side so you can hook up an exhaust fan to help keep things cool. This will allow you to keep your light as close as possible without burning them up, so you can make the most of your light. Below is a guide for how many lumens are lost with the distance your light is from your plants.
Pros: High Pressure Sodium lights are currently the industry-leading choice of light bulb. It has the best overall lumen/watt ratio, the strongest intensity, a wide range of spectrum and last much longer then other traditional growing bulbs.
Cons: High Pressure Sodium bulbs are rather expensive, both initial cost and power consumption. They produce a lot of heat, and if not properly installed they can be dangerous. If not properly ventilated, they can pose heat problems and potentially burn your plants.
HPS emery consumption chart
HID Light Output Primary Growing Area Supplemental Area
100 watts 2′ x 2′ 3′ x 3′
250 watts 3′ x 3′ 4′ x 4′
400 watts 4′ x 4′ 6′ x 6′
600 watts 8′ x 8′ 12′ x 12′
MH (Metal Halide)
MH (Metal Halide) is a member of the high-intensity discharge (HID) family of lamps. They produce high light output for their size, making them a compact, powerful, and efficient light source. Like other gas-discharge lamps such as the very similar mercury-vapor lamps, metal-halide lamps produce light by making an electric arc in a mixture of gases. In a metal-halide lamp, the compact arc tube contains a high-pressure mixture of argon, mercury, and a variety of metalhalides. The mixture of halides will affect the nature of light produced, influencing the correlated color temperature and intensity (making the light bluer, or redder, for example). The argon gas in the lamp is easily ionized, and facilitates striking the arc across the two electrodes when voltage is first applied to the lamp. The heat generated by the arc then vaporizes the mercury and metal halides, which produce light as the temperature and pressure increases. MH emits mostly blue, which is why growers find it suitable for vegetation. They allow your plant to grow at it’s own rate; unlike when using HPS, the plant feels the need to grow faster. Using MH during vegetation ensures a grower a bushy, fulled out plant. The nodes will be closer together apposed to using HPS.
Pros: Metal Halide lights go hand-in-hand with High Pressure Sodium lamps, being the industry’s leading source of light. They produce very good lumen/w output, offering a wide range of spectrum (mostly blue) and are relatively cheap. They are the best suitable for vegetation; normally providing a very even and bushy growth.
Cons: Metal Halide lights “burn out” faster than other grow bulbs (about 1/2 the life of a typical HPS). They run very hot, much like HPS lights, so ventilation is a must. Metal Halide lights also (unless a dual ballast) require there own type of ballast.


HUMIDITY
Figures in green are the sweet spot, yellow and red are out of range.

Trichomes 101


LOCKOUT
What is Nutrient Lockout?
[ame="http://www.youtube.com/watch?v=AVM4Y5IvYt4"]LOCKOUT VIDEO[/ame]
Nutrient lockout is when a plant is unable to uptake a nutrient or nutrients, even if the nutrients are readily available. Basically, the nutrients may be in the soil or media you are using, but your plants won’t be able to absorb them. This is caused by two different ways. The most common way is by an unbalance of pH in your solution or media. The other way is because of an excess amount of nutrients, thus locking out other nutrients. For example, too much Nitrogen will lockout Potassium and Calcium.
Cloudy water!
There is no such thing as lockout as a chemistry term. You basically are seeing ions re-combining in different ways, and some are more soluble in water than others, but if you are seeing the cloudiness go away, that means it re-dissolved. i.e. "no lockout".
The temporary cloudiness simply has to do with a localized concentration is that is temporarily too high. Then diffusion allows for the concentration of that 'less soluble' species to decrease to where it dissolves again.
So if your adding something that is of high or low PH then dilute it first and or make it PH neutral.
Or else you will make 2 parts combine into 1 and settle to the bottom or moving around as visible particles......cloudy water!!!!
Nutrient pH lockout chart

mobile elements
A mobile element, such as nitrogen, is able to move itself around the plant as needed. For this reason, signs of deficiencies are first noticed in the older leaves. The plant will send mobile elements to where it needs it most, which is new developing foliage and leaves. So mobile elements will always show in older leaves, because the plant will send those nutrients to new development.
Immobile elements
Immobile elements are those that cannot move around the plant as needed, staying stationary in their original destination. Elements such as boron are immobile, which deficiencies almost always occur in the new leaves. Since new foliage is born lacking a certain element, it is going to grow abnormally, or deficient. Since an immobile cannot travel where it’s needed, newer growth will be the first to show signs, while the older leaves will appear normal (because the old leaves still have traces of that nutrient).
What are Macronutrients (Essential Nutrients)?
Nutrients that are required in higher amounts and are necessary for plant development.
Macronutrients (Primary Nutrients): Nitrogen, Phosphorus, Potassium
Macronutrients (Secondary Nutrients): Calcium, Magnesium, Sulfur
Two University of California plant physiologists, Arnon and Stout, set three requirements that an element must meet in order to be considered “essential”:
1. Omission of the element in question must result in abnormal growth, failure to complete the life cycle, or premature death of the plant.
2. The element must be specific and not replaceable by another.
3. The element must exert its effect directly on growth or metabolism and not by some indirect effect, such as by antagonizing another element present at a toxic level.
Elements that are required in very small amounts for proper photosynthesis.
Micronutrients (Trace Minerals): Boron, Copper, Iron, Manganese, Molybdenum, Zinc, (Chloride)*
The commonly used unit of concentration for the micronutrients is parts per million (ppm), avoiding the confusion that would come with decimals if the concentration in the plant’s dry weight were in per cent. In metric units, micronutrient concentration is expressed in milligrams per kilogram (mg/kg). One ppm is equal to 1 mg/kg. Another equivalence for solution concentration used in this article is milligram per liter (mg/L) equal to parts per million (ppm).
What are Micronutrients (Trace Minerals)?
Micronutrients as a group, are far more critical in terms of their control and management than most of the major elements, particularly in soilless culture systems. Most micronutrient deficiencies can usually be corrected easily and quickly, but when dealing with excesses or toxicities, correction can be difficult, if not impossible. If toxicity occurs, the grower may well have to start over. Therefore, great care must be taken to ensure that an excess concentration of a micronutrient be not introduced into the rooting media, either initially or during the growing season.
The availability of some of the micronutrients, particularly Fe, Mn, and Zn, are significantly affected by the pH of the rooting medium, particularly in organic soilless mixes. A pH greater than 5.5 can result in a micronutrient deficiency, though a recommended quantity of that micronutrient had been added to the mix. The level of a major element, particularly high P, in a rooting medium will affect the uptake of Cu, Fe, Mn, and Zn. Therefore, proper control of the pH and concentration of major elements in a rooting medium are important to ensure “available” sufficiency.
Since the requirements for some of the micronutrients are relatively low, there may be sufficient concentration in the natural environment (i.e., in the water used to make a nutrient solution, in the inorganic or organic rooting media substance, as a contaminate in a major element supplying reagent or fertilizer, or from contact with piping, storage tanks, etc.) to preclude the necessity to add micronutrient. Therefore, it is best to analyze a prepared nutrient solution after constituting it and after contact with the environment to determine its micronutrient content. In addition, careful monitoring of the rooting media and plants will ensure that the plant’s micronutrient requirement is being satisfied but not exceeded.
*Some scientists believe chloride should not be listed as a trace mineral, since plants contain so little amounts of it and the amount it takes can easily be found in the soil or rainwater, it does not deserve to have its own page as a trace mineral.
Other elements also play a part in plant growth. Aluminum, chlorine, cobalt, iodine, selenium, silicon, sodium and vanadium are not normally included in nutrient mixes. They are required in very minimal amounts that are usually present as impurities in the water supply or mixed along with other nutrients.
Chlorine (Chloride) (Cl) Immobile
What's Chlorine's (Chloride) purpose in photosynthesis?
Purpose: Fundamental in photosynthesis and cell division in the roots and foliage. It increases osmotic pressure in the cells, which open and close the stomata to regulate moisture flow within the plant tissue.
Deficiency/Toxicity: Because it’s needed in such small amounts, deficiencies rarely occur. In the rare case a deficiency does occur, roots may become stubby, new leaves will wilt and be pale. Leaves will turn bronze with progression. Both a deficiency and toxicity will show the same characteristics!
Treatments: For deficiencies, use chlorinated water. For toxicity, flush the soil out with clean, un-chlorinated water. Let water sit for 24-48 hours before using (chlorine evaporates into the atmosphere).
Cobalt (Co) Immobile
What's Cobalt's purpose in photosynthesis?
Purpose: Necessary to help beneficial bacteria grow. Vital for nitrogen absorption, and scientific evidence suggests its linked to enzymes needed to form aromatic compounds. Cobalt is essential to many beneficial bacteria that are involved in nitrogen fixation of legumes. It is a component of vitamin B12 which is essential to most animals and possibly in plants. Reports suggest that it may be involved with enzymes needed to form aromatic compounds. Otherwise, it is not understood fully as to its benefit to plant growth, but it is considered essential to some animal health issues.
What's Silicon's purpose in photosynthesis?
Silicon usually exists in solution as silicic acid and is absorbed in this form. It accumulates as hydrated amorphous silica most abundantly in walls of epidermal cells, but also in primary and secondary walls of other cells. It is largely available in soils and is found in water as well. Inadequate amounts of silicon can reduce tomato yields as much as 50%, cause new leaves to be deformed and inhibit fruit set. At this time toxicity symptoms are undetermined.
What's Sodium's purpose in photosynthesis?
Sodium seems to encourage crop yields and in specific cases it acts as an antidoting agent against various toxic salts. It may act as a partial substitute for potassium deficiencies. Excess may cause plant toxicity or induce deficiencies of other elements. If sodium predominates in the solution calcium and magnesium may be affected.
Nutrient deficiencies
Nutrient deficiencies are caused by too much or too little of one or several nutrients being available. Nutrients are available between a pH range of 5 and 7 and a Parts Per Million (PPM) range of 0 to 2000. To maintain these conditions is the key to the perfect nutrient uptake. However, the best conditions would be a pH level of 5.8 for hydroponics, and 6.3 for soil and coco media. PPM (parts per million), should be between 0-300 for small cuttings and seedlings, 700 for vegetative stage, and up to 1500-1700 in full bloom.
Over twenty elements are needed for a plant to grow. Carbon, hydrogen and oxygen are absorbed from the air and water. The rest of the elements, called mineral nutrients, are dissolved in the nutrient solution. The primary or macro- nutrients (nitrogen (N), phosphorus (P) and potassium (K)) are the elements plants use the most. Calcium (Ca) and magnesium (Mg) are secondary nutrients and used in smaller amounts. Iron (Fe), sulfur (S), manganese (Mn), boron (B), molybdenum (Mo), zinc (Zn) and copper (Cu) are micro-nutrients or trace elements. Trace elements are found in most soils. Rockwool (hydroponic) fertilizers must contain these trace elements, as they do not normally exist in sufficient quantities in rockwool or water. Other elements also play a part in plant growth. Aluminum, chlorine, cobalt, iodine, selenium, silicon, sodium and vanadium are not normally included in nutrient mixes. They are required in very minimal amounts that are usually present as impurities in the water supply or mixed along with other nutrients. (The nutrients must be soluble (able to be dissolved in water) and go into solution.)
(Note: A plant may have a certain deficiency from nutrient lockout. In cases of nutrient lockout, the nutrient may be in the soil but the plant is unable to uptake it. For example, too much calcium in the soil will cause a potassium lockout. Although you may see signs of potassium deficiency, what you really have is a calcium buildup. To fix this, you will have to flush your plants and adjust the pH before applying anymore (in this case) potassium.)


